
Photographing the Moon: the basics
What you need
You can take good images of the Moon with just a single lens reflex (SLR) camera and a 250 mm telephoto lens. To get the best detail, you need a telephoto lens of at least 500 to 600 mm and ideally a long focal length telescope.
Where to go
Choose a location that allows an unobstructed view of the Moon for several hours and try to set up far away from buildings and other sources of heat.
How to take the photo
If you are using an SLR, a long focal length telescope and a tripod, then shutter speeds of 1/30th of a second are fine. Use a low ISO setting to reduce noise and underexpose slightly to prevent bright details burning out.
Photographing the Moon: tips from the experts
Shortlisted entrants from Insight Investment Astronomy Photographer of the Year 2018 share their photos and top tips.
Creating the perfect mosaic image of the Moon
By John Skouros
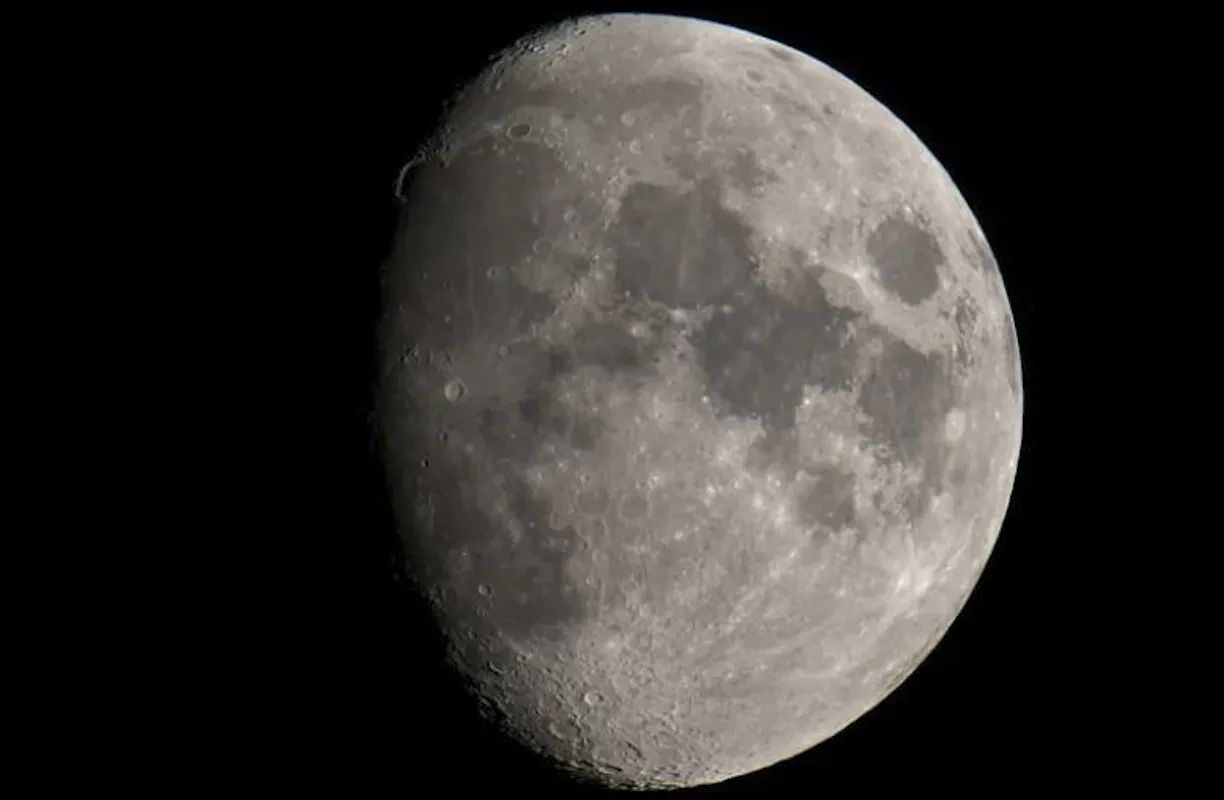
If you want to capture a series of shots to build up a mosaic image, ensure similar light conditions throughout the entire shoot. This will reduce the amount of processing required later.
For detailed mosaics you can reduce the effects of atmospheric turbulence by capturing high speed shots. I take a series of audio/video interleave (AVI) files, since it is easier to deal with a handful of AVI files than thousands of individual shots.
To do this, start at the terminator line and set the focus. Zoom in on the image and ensure it is as sharp as possible. Set the exposure and move around the rest of the Moon’s surface, checking the camera’s histogram and adjusting the shutter speed and camera gain (sensitivity) until there are no saturated areas. Your settings will probably give exposures of about 30 to 40 frames per second. Although these may make the shadow section appear very dark, it is better than having other overly bright areas.
Head back to one end of the shadow and capture the first AVI. Load the file into a manual stitching program like iMerge and move the telescope to the next small section of the Moon to build up a rough mosaic. In total I record a series of about 25 AVIs, each of 1000 frames.
Each AVI needs to be converted into a single image, which is then joined with others to produce a panorama. It takes considerable effort to do this accurately but it is well worth spending the time to get it right. Use imaging software such as the free RegiStax 5.1 program to stack the AVIs into separate high resolution images and iMerge to stitch these together. You can enhance the contrast using the curves feature of a photo-editing program like the free GIMP and sharpen the image with a high pass filter.
What John used:
I use an 80 mm aperture, 600 mm focal length telescope with a heavy duty equatorial mount and a high frame rate monochrome sensor camera. A 2 x Barlow teleconverter lens increases the overall magnification and Infrared (IR) and ultraviolet (UV) filters prevent light of these frequencies swamping the image. A red filter helps reduce the effect of turbulence in the Earth’s atmosphere, enhancing the visible surface detail.
“The Moon is a wonderful object to photograph, with constant changes of view throughout the lunar cycle. Capturing the detail as the ‘terminator’ shadow sweeps across the surface then watching the final image come together is a highly satisfying experience.”
John Skouros
Incorporating a landscape in Moon photography
By Ainsley Bennett
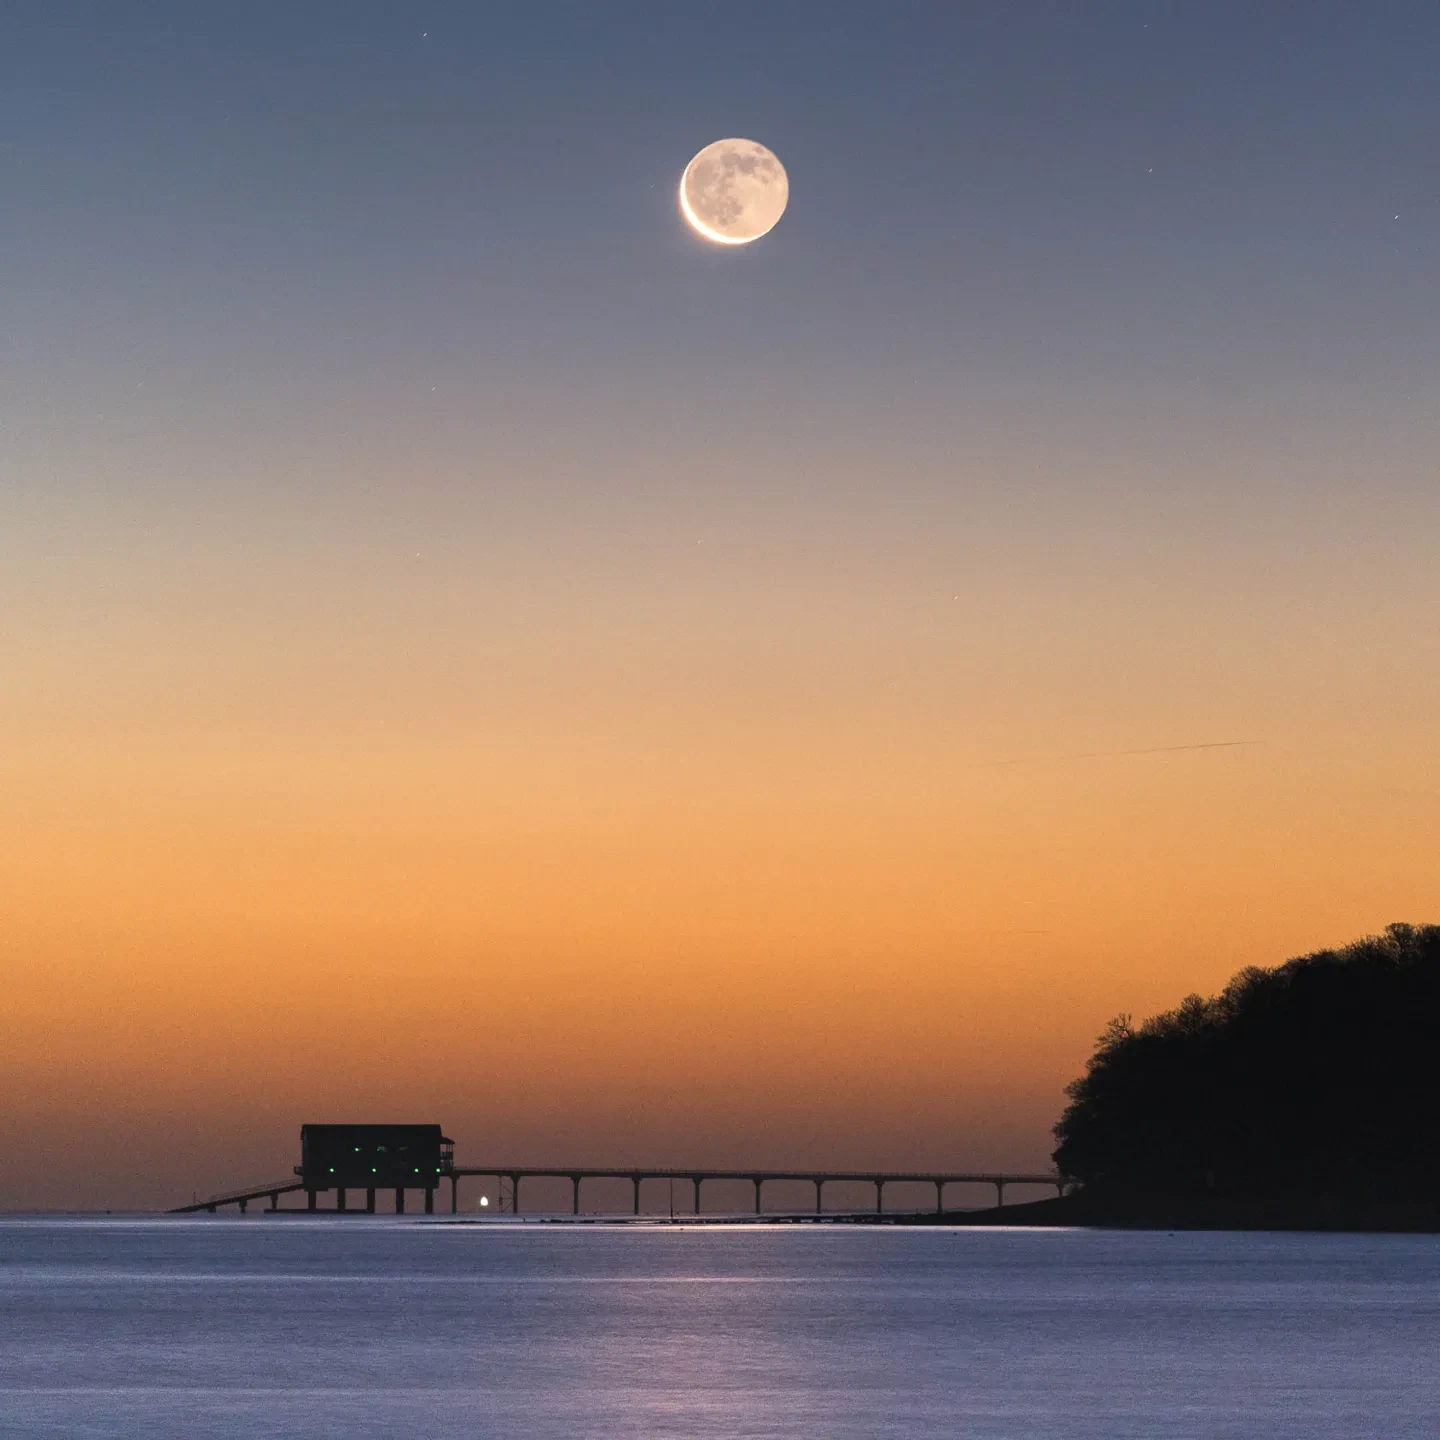
All of my Moon images incorporate my local landscape, which I prefer to photographing just the Moon in the sky. However, including landscapes adds the challenge of having to carefully plan shots depending on the Moon's position and angle in the sky at different times of the day/night and time of year.
What Ainsley used:
I was hoping to use a longer focal length as the Moon started to rise, but due to the light levels being very low, all my shots were unusable. I opted for another wider lens to capture the Moon as it rose higher above the horizon.
Ainsley’s top tip: watch the weather
Using long lenses the angle of view is very small, so quite often there are only very small windows of a few minutes to capture certain shots. When capturing the Moon beginning to rise or set on the horizon, the weather conditions play a vital role, with any cloud or atmospheric distortion quite often hampering attempts at getting the right shot.
Photographing the Moon against an object
By Sean Goebel
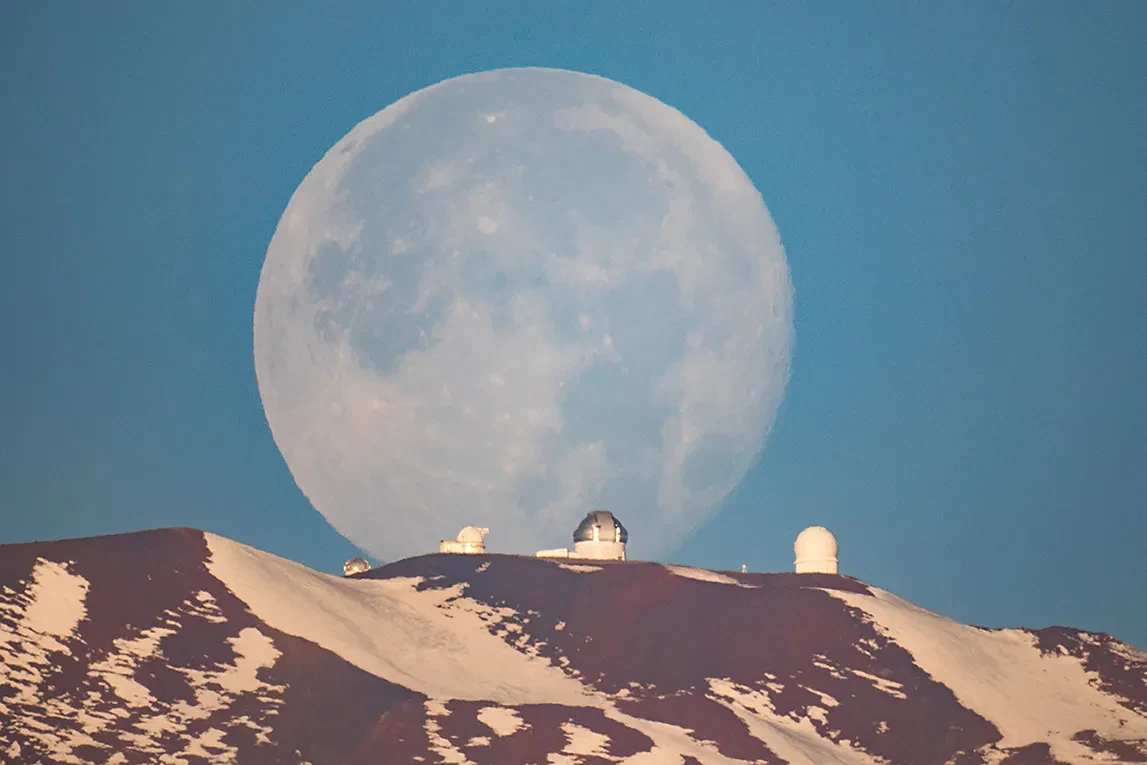
I try to photograph the moon next to interesting landmarks, but this creates several challenges. First, it necessitates that I photograph the moon when it is low in the sky. This means that there is a higher probability that clouds will obscure the moon, and even if the conditions are clear, the moon will be highly aberrated by atmospheric turbulence. Therefore, I am somewhat dependent on luck for clear and minimally-turbulent skies. Second, the window of time to catch the moon in the intended composition is very short (minutes or even seconds). Therefore, I must have my camera settings pre-prepared (which is non-trivial for a bright moon rising in the dark), and I need to be in exactly the right location.
What Sean used:
I tested out cameras on some backyard telescopes, but the vignetting and sharpness were really poor, so I bought a 1970s vintage Nikon 1,000 mm f/11 mirror lens off eBay. After several months of waiting for clear skies (it’s nearly always cloudy in Hilo, where this was taken from), I had an opportunity to photograph the Full Moon setting at sunrise. This is a still frame from a timelapse video.
Sean’s top tip: plan your shoot
I spend quite a lot of time using programs such as The Photographer’s Ephemeris, Stellarium, and Google Earth to plan out my Moon photoshoots. Many of the attempts fail, but the reward is a moonrise image that is actually real and hasn’t been composited together.
Taking a filtered view of the Moon
By Steve Brown
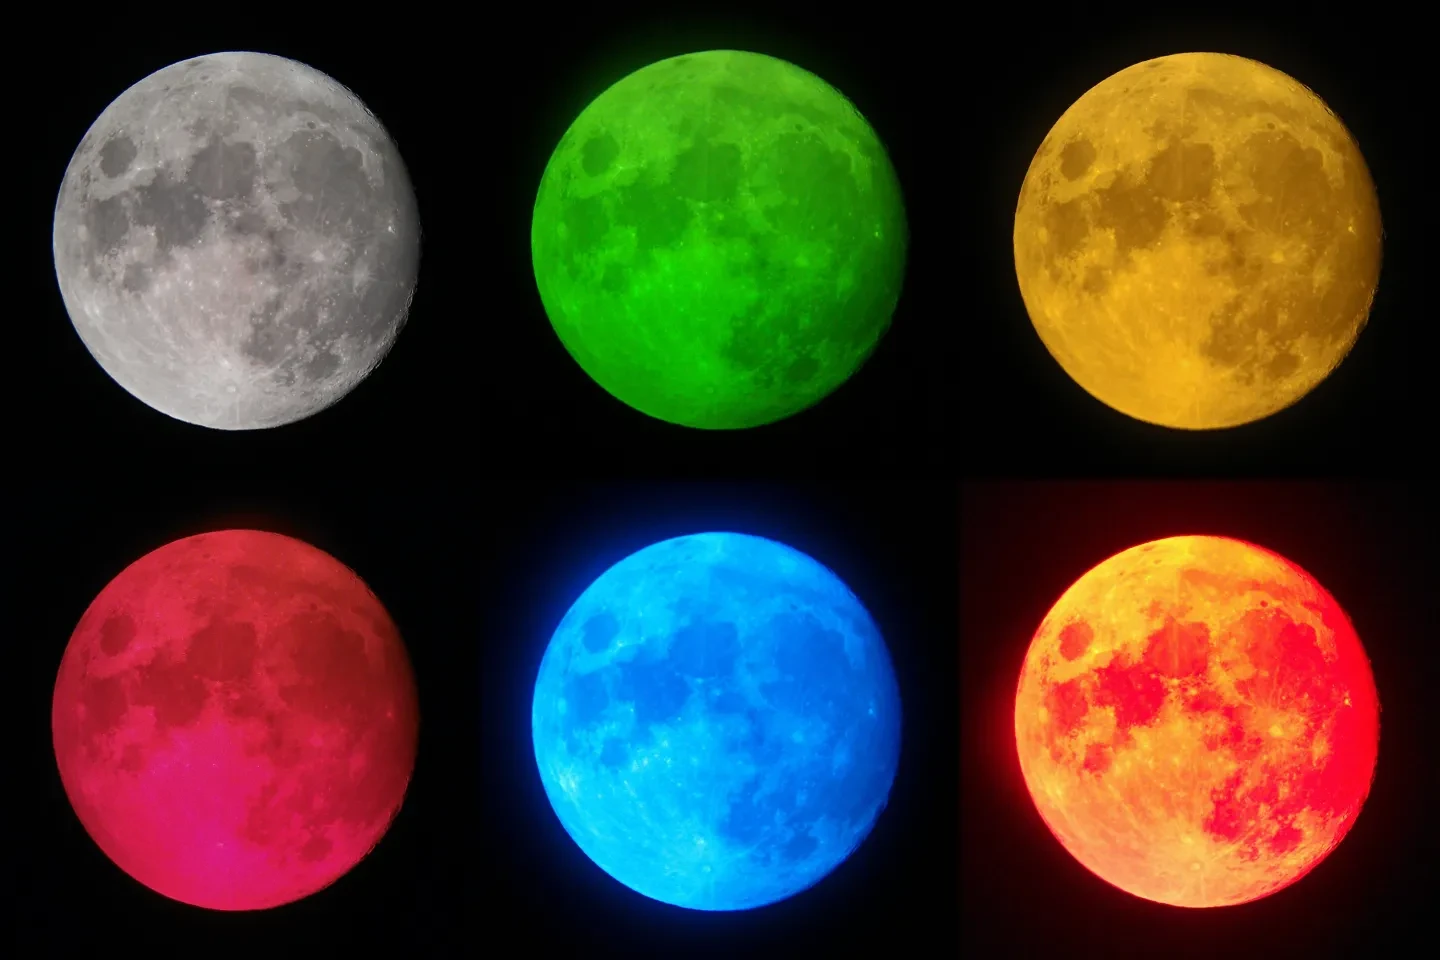
Some of the challenges of photographing the Moon are that it's so large! When near the full phase it doesn't quite fit in the view of my 6" telescope when using a DSLR to photograph it. This isn't a problem when using different methods though, such as holding my smartphone up to the eyepiece or using a zoom lens on my DSLR. Another issue can be the 'seeing', i.e. the image of the Moon wobbling and distorting as the light from it passes through our turbulent atmosphere. This makes single images of it somewhat blurry when viewed close up. This can be resolved to an extent by stacking several images together using special software.
What Steve used:
These shots were taken with a smartphone and a NexStar 6SE telescope using the afocal method, holding the phone up to the telescope eyepiece and taking the picture. This allowed me to add the filter to the eyepiece to see what type of lunar image this would create. I used various Wratten filters: #56 Light Green (top middle), #12 Deep Yellow (top right), #25 Red (bottom left), #80A Blue (middle bottom) and #21 Orange (bottom right). The top left image is unfiltered.
Steve’s top tip: observe the Moon’s shadows
I love photographing the Moon despite these issues because it's always changing. Every night the phase changes, meaning the features on the lunar surface receive different levels of illumination, causing them to look very different each night. You can even watch the shadows creep across the surface in real time through a telescope, which is amazing to observe.

Visit the Astronomy Photographer of the Year exhibition
See more amazing pictures of the Moon and space at the ZWO Astronomy Photographer of the Year exhibition.
Header image: Mineral Moon © Daniele Borsari, shortlisted in ZWO Astronomy Photographer of the Year 2025 Young